
Choosing the Best Field Guide For Birding
As an educator I'm often asked to help people with advice about choosing a good field guide for bird watching or birding. There are so many different guides it's hard to wade through them all and to know which ones are the most user friendly. This post is not designed to tell you if the Sibley field guide is better than the National Geographic field guide. I am giving you guidelines to help you make your own decisions by offering a rubric so that you can intelligently weigh all the options.

(Photo: Common use flicker, Niconecado)
Step 1: Define Your Needs and Your Price Range
Before you head off to the bookstore it's best to do a bit of soul searching. Here are a few questions to ask yourself:
- How old are the people in your household that are using the guide? If you answered that you have children using the guides then you'll want to consider a more simple guide with large pictures.There are birding guides for "young birders" that are mid range (10-15 yr. old) as well. If you're going for something for adults you can focus a bit more on pictures with descriptive text. Try to avoid jargony, text only, field guides for experts until you're ready. We'll discuss the types of pictures you should choose shortly.
- Are you only looking at birds at your feeder or back yard? If you're looking for something for your back yard then there are a variety of "Feeder Birds" books without all the complexity of the complete Rolodex of birds of North America, no need to look further.
- Are you interested in local birds or all birds of North America? If you are interested in local birds of a particular region there are many options from regional to international. If you think you may be birding locally but also traveling around the US then a "Birds of North America" guide will work best. The perk of having a regional guide is that you can narrow down the bird your looking at more quickly if you don't have to wade through birds from all of North America.
- Do you want to carry the book with you or have it as a desk reference?
Believe me, there are plenty of large books out there, ranging from Kauffman's birding bible to entire tomes on gulls and sparrows, all of which are way too heavy to regularly carry them into the field. They're best left on a coffee table or in the car. If you're buying a book then know how and where you intend to use it.

- How many guides do you want to buy? The number of guides you'll need really depends on the questions you answered above. As a good start I would suggest at least two, one of regional birds and one for birds of North America in case you travel. With two you can also cross reference the images, range maps, and descriptions. If you're more a generalist and want to focus on all of North America, you can get away with one or go for two that are slightly different in content and layout for cross referencing as well. We'll discuss layout in more detail below.
- Do you want to buy a paperback guide or use an electronic guide or app? There are pros and cons for electronic v. paper. I find that the tablets and readers are difficult to take into the field and lose their charge over time, which may leave you stranded. Many can also not be read in bright sunlight or if you're wearing sunglasses. A paperback version may be bulky but you can always get a field guide carrier or bring a backpack. Phone apps are the most handy because they come in a smaller portable format that is always with you, but again you have the charging concern and for older folks the tiny screen may be an issue. Choosing a guide depends on your needs, budget, and the types of environments you'll be going into. Overall I find the paperback easiest to browse and you don't need to plug it in.
Step 2: Look For The Best Characteristics
There are several things you should look for in a good field guide. Knowing these features will help you figure out if you like the field guide's layout and design and if it's easy to use.
- List of Bird Families-One of the places to start learning to bird is by learning the general characteristics of bird families (or groups of birds) that are genetically and physically related. Different guides present these differently. I like the guides that give you a quick index in the front of the guide, or even a visual index to the generic shapes of the birds in each family and the associated page ranges. Some also have tabs on the side of the book, or color coding, for each family from warblers to gulls. Begin your early training by learning the outlines or silhouettes of each member of these families because at first this may be the only glimpse of a bird you get.
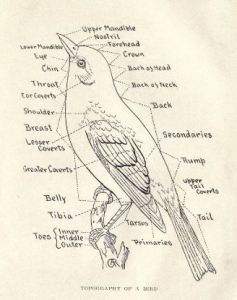
- Parts of a Bird-As a new birder, or going back and refreshing, it helps to have a page or two dedicated to the terms that are used to describe the topography of a bird. Any field guide worth its salt has these diagrams. They will help you familiarize yourself with the bird's external anatomy and the types of field marking you should be looking for. After all, would you know where the malar stripe on a sparrow is found? What about the gorget of a hummingbird?
- Range Map and Range Map Key-Each bird listed should have a range map associated with it. This is a small map that tells you where the bird can commonly be found year-round, during breeding, its winter range, main direction of migration, irregular ranges, and selected breeding colonies. There should be a "key" or guide to the different colors on the map that correspond with the ranges. You may find this key on the inside front or back cover. RANGE MAPS ARE CRUCIAL! If a field guide doesn't have range maps then it's way too simple (for children) or you should put it down. The range map allows you to quickly visually identify if the bird is in the state/region you're standing in. If its year round range is northern Maine and you live in southern California then you can eliminate the proposed ID very quickly. MAKE SURE THAT THE RANGE MAPS ARE NEXT TO THE BIRD LISTED. If the range maps are in the back of the field guide then you're going to spend too much time going back and forth from the bird you're looking at to the back of the book (older guides were laid out like this, don't skimp and get a newer one!).

- Common Name, Latin Name, Size, Description-All field guides need to have these features listed. You'll probably never use the Latin name of the White-collared Seed Eater but someday you may find yourself more interested in their taxonomy (naming and classification). For size you'll see the letter "L" with a number. This means the length of the bird from tip of bill to tip of tail. You'll also see the letters "WS" which mean wingspan, or the length from wing tip to wing tip. Occasionally you'll also see a "W" which means weight. When you read the bird's description be sure that you're comfortable with their language and check to make sure it's not too jargony or complex, especially for new birders, this can turn you off very quickly.
- Four Letter or Six Letter Code (optional)-Although not necessary for beginning birders, you should be aware that some guides may also give you a four letter or six letter code for bird names along with their full name. The US Geological Survey Bird Banding Lab (at Patuxent Wildlife Center in MD) uses these codes to identify birds quickly. Many birders find them easier to call out than the entire name of the bird (and easier to put on a leg band). For a complete list visit the South Bay Birder's Unlimited site for a PDF http://www.stanford.edu/~kendric/birds/BBLCode.html. Essentially the first two letters of the abbreviation are the first two letters in the first name of the bird, and the second two letters of the abbreviation are the first two letters in the last name of the bird. For example the American oystercatcher's code would be AMOY. The six letter code comes from the bird's Latin name. The American oystercatcher is Haematopus palliatus, so the code would be HAEPAL. Imagine how cool you'll sound calling out AMOY or HAEPAL to your bird friends now that you know!
- Drawings v. Pictures- This is the crux f a field guide, using visual representations to match up what you see in the field with what is in the book. For children and young birders, or for very simple birding in the back yard, photos are OK but not great. A photo is a picture of ONE bird, and not representative of the wide variety of markings that you might see in the wild. Artists can create the "Ultimate Universal" picture of a particular species while photos only capture one bird, at one moment in time, from one region, and none of the variety inherent in all the birds out there. The bottom line for me is STAY AWAY FROM PHOTOS. The only caveat I will give to this rule would be if you're working with birds of prey and you want to learn their silhouettes, then black and white photos are very useful.

- Field Markers on the Images-A good field guide should have "call-outs" or lines pointing to key identification features on each bird. This may be an eye stripe, a chest dot, or the color of the bird's legs. The call-outs should appear with each image and give you quick insights into the bird's most important markings. Some guides only give you arrows which are pointing to key features described in the text. If you're comfortable with going back and forth to the text, or just "winging" it with looking at what they're pointing at, you should be OK. However, for those that need concrete descriptions go for a field guide that has text on the pages with the call-outs next to the actual drawing or picture.
- Types of Images: Flying Silhouettes, Juvenile Coloration, Males and Females- A good field guide should have images of birds in different plumages. Birds molt, or shed their feathers, so they look different during the Spring and Summer from how they would look in the Fall and Winter. Many have life stages where the juveniles look like females, and some like gulls and eagles have up to four plumages they go through during their journey to adulthood. Make sure your field guide has a variety of images for each bird, the sexes, seasonal coloration, and their life stages. For some birds like hawks, eagles, and falcons you also want to see a page or plate with the silhouette of the birds flying. Birds of prey are often spotted from far away and they look like black dots up high. Knowing a bird's general shape and silhouette when flying can be very helpful.
Step 3: Don't Rule Out Digital Media and Apps

As a traditional birder, classically trained outside by the seat of the pants with a field guide and binoculars, technology is something I'm really starting to enjoy over the last few years, and it's great for integrating into classrooms to get kids engaged. There's so much out there! Fortunately there are some great, easy to use, programs for your phone or tablet. The best resource I've found, that explains the apps that are out there is the Nature Conservancy's blog post "Boucher's Birding Blog--Apps for the Smart Birder, Which One Should You Use." (May 27th, 2013). This blog has a great run down of the features of the main apps out there and their ease of use:
- Audubon Birds ($4)
- iBird Pro ($20)
- National Geographic Birds ($10)
- Peterson's Birds ($2)
- Sibley's eGuide to Birds ($20)
The only app not covered in the blog post by Boucher is the BirdsEye of North America. It's the collaboration between Cornell Ornithology Lab and the eBird project. It's $20 so a bit pricy, but it has great feedback and ratings from users. eBird, as posted on our technology blog page, is a great way to get involved with citizen science and recording your sightings, a bit of a double purpose for the BirdsEye app.
The nice thing about the apps is that most of them come with ways to search for different bird field markings and families of birds. They help you narrow down your choices which something you don't get with a paper field guide. Additionally most apps also offer quizzes to help you hone your skills. It's a great way to learn your birds when on the metro on the way to work.
Step 4: Buy Your Guide and Get Out There!
The best way to practice using your field guide is to get outside. Remember, my number one rule is to keep your field guide in the bag until you've thoroughly looked at a bird and it's gone. Many first time birders make the mistake of looking at a bird with binoculars, taking their eyes off the bird to look in a field guide, and looking back up to find the bird again to confirm its markings only to find that it's gone! Don't be this person. Look at a bird and study it completely, memorize its features, and don't look away until either you're "saturated" with information or it's gone. It's then that you can pull out the ol' field guide or app and get cracking!
Step 5: Consider A Life List or Posting Data Online
Along your birding journey consider keeping a life list. This is a list of the birds you see over your lifetime. It can be as detailed or as general as you like. Many birders aspire to find all the birds in a given region or family of birds. You can find life lists in the back of some field guides and most of the apps have life lists. I don't suggest writing your sightings in a field guide, because they get wet or lost. Better yet, you can create a life list and contribute to citizen science through the eBird application through the Cornell Ornithology lab. You can read a short description of how it works on the "Get Involved" section of this blog here.
Step 6: Visit My Post on How to Properly Focus Binoculars (and a link on how to choose binoculars)
If you're interested in specific field guides you can find out what's out there, and the ratings others have given them by visiting the Amazon review page called "Review of Bird Field Guides."