
Eastern Black Walnut Harvesting and Nut Preparation
It's not often that you find food lying around on the ground waiting to be harvested. In this post we'll explore how to harvest black walnuts and prepare them.
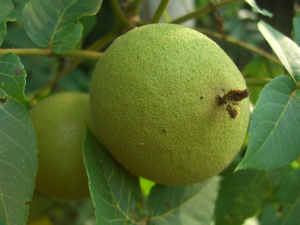
The Eastern black walnut (Juglens nigra) is a common tree in the Eastern US and provides a delicacy of nut meat. The Eastern black walnut is different from the English walnut that you find in grocery stores. The English walnut has a larger nut and thinner husk and it's easier to crack. The meat of black walnuts tangier and has a more nutty and wild taste. Black walnut trees produce nuts between September and October, with optimal harvest in mid to late October, though November is OK too.
Before you begin you'll need a few things:
- Location where you have permission to collect
- 2-3 five gallon buckets
- Gloves so that your hands won't get stained
- Plastic bags to collect the nuts
- Drying trays
- Vice for cracking nuts (alternately burlap bag and hammer)
- Hammer
- Nut picks
- Composting area for nut hulls
The hulls of walnuts are dark green and they lighten as they age, to almost black. The ideal time to harvest them is when they are green, not black, and the husks are somewhat soft. You should remove the husks as soon as they are harvested because they contain acids in them that will darken and sour the nut meat. Remember to wear gloves when you harvest the nuts, they will dye your hands greenish yellow (thee dye was used in colonial times for making clothing and basket dyes).
How do I get the husk off?
DO NOT RUN OVER THEM. Some videos show people running over the nuts with their trucks or cars. This can be dangerous, especially if the nuts are thrown from the vehicle's tires. Running over them can also stain your driveway so it's not a great idea. There are several ways to remove the husks, some suggest stomping on them with your boots, but this may cause twisted or turned ankles. The best method I've found is just putting them on a rock or piece of concrete and hitting them with a hammer. The husk should come right off. The nut inside will be fine. For younger nuts the internal nut color will be blonde, for older nuts blackish.
NOTE: Be sure to compost the nuts somewhere that their hulls will not leech their acids into the soil and prevent the growth of new young plants. The hulls of the plants contain a chemical called juglone, which is a plant growth inhibitor.
What if I see bugs in the green hull?
Don't be surprised if you see the walnut husk maggots in the hulls of your nuts. They make the hulls green-black and mushy. Try to avoid picking these up, but if you do the maggots won't affect the walnut or nut meat but try to skip these just in case.
After the nuts are hulled you must cure them
You need to cure the nuts after they have been hulled. It's best to store them for up to 6 weeks in a dry safe place (preferably away from squirrels). When you store them keep them in shallow pans or screens. If you keep them in deeper containers the nuts won't dry properly and may mold. The curing process is important, because the nuts inside the shell shrink and pull away from the hulls. This makes separating nut meats easier later on.
Cracking the nuts
You can buy special black walnut crackers on the internet, but the nut crackers sold commercially for English walnuts won't work because they're too weak. There are many alternative methods for cracking the nuts. Some suggest using a vice, but a hammer works just as well. It helps if you can soak the nuts in a bucket up to twenty four before you're ready to begin. Soaking causes the nut meats to swell and become more flexible when cracked. For cracking you can either use a hammer on a hard surface, such as a driveway or sidewalk, or you can put the nuts in a burlap sack and use a hammer. The burlap sack works well because you can then dump the nuts on a surface indoors for sorting. When the nuts are open use a pick to separate out the pieces of nut meat. You can also use sieves to sort dust, smaller pieces, larger pieces, and the nut meat.
Drying and Storing the Nuts
If you intend to use the nuts right away you can store them in the refrigerator for a short time. For longer term storage you can also freeze the nut meats. If you wish to dry-store the nut meat you can also dehydrate the nuts with a dehydrator, or in the oven at 200 degrees for 15-20 minutes.
Now you can enjoy!